|
Member
Join Date: Jun 2016
Drives: FR-S
Location: USA
Posts: 20
Thanks: 0
Thanked 54 Times in 9 Posts
Mentioned: 1 Post(s)
Tagged: 0 Thread(s)
|
Repair: Metallic Rattle From Driver Dash on Rough Roads (EPS Motor Damper)
There's already a good repair guide with lots of comments here, but I wanted to post the process I took as well (since I'll probably be doing it again in the future when it starts happening again)...
The rattle I was hearing was a metallic sound like a bolt with a washer was loose and would make clinking sounds when driving over any rough patches in the road. Please note, there are other things that can rattle under the dash, this may not be your rattle/fix...
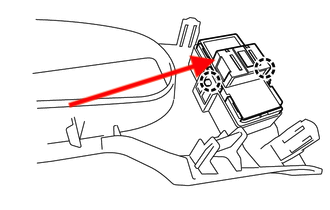
The culprit is a plastic / rubber "damper" piece that goes between the upper steering column and the electronic power steering motor. The motor additionally reduces excessive vibrations in the steering wheel when driving over rough areas by quickly moving back and forth to counteract the wheels' torque on the steering system (or so I've read). The rubber gets old and brittle, breaks apart and falls off, then the metal teeth of the motor and it's counterpart on the steering column start making contact with the plastic part of this damper causing noises. The manufacturers are aware of the issue, Subaru has a technical document (SB22-036), Toyota/Scion don't. Apparently other vehicle's dampers can be used with modifications, but I choose to use the genuine part: #45254-28040

The following is on a 2016 Scion FR-S Left Hand Drive Manual Transmission US Version, other years/versions may vary slightly in what needs to be done from what I've read (including the difficulty in removing a particularly vexing bolt on the steering column).
Technically, you don't need to drop the steering column or remove anything but the lower dash panel/reinforcement, but you'd be working in a very cramped space otherwise.
Notes:- There is a flange hex bolt under the dash that holds the steering column up, it's known to be troublesome; one way to make things easier is to grind off a part of the flange. (due to the orientation of the bolt and it's purpose, it shouldn't cause any issues)
- It takes about 45-90 minutes to tear down, replace the part and re-assemble
- In the following, "rear-ward" means in the direction of the vehicle rear
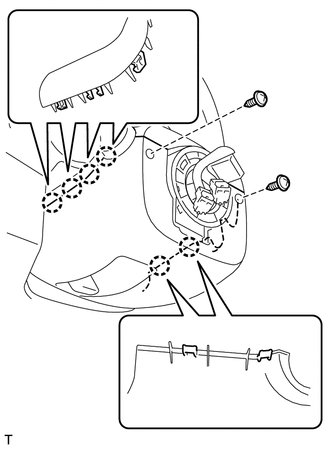
- Disengage trim clips according to diagrams to prevent damage, a trim tool is useful
- If something isn't coming apart / going together as expected, find the technical manual for your year/version, inspect the item or ask someone, as to prevent damage
- As parts are removed, I like to sit their corresponding screws/nuts next to each part, or tape them to a piece of paper and label them
- You don't need to remove the steering wheel (you may have to re-align it if you do)
- You don't need to remove the steering column (you may have to re-align steering if you do)
- You don't need to remove the instrument cluster
- You don't need to loosen the pedal assemblies (I saw it helped some people but didn't help me much, might be year/version specific)
Tools:- Trim panel tool
- Phillips screw driver (normal)
- Phillips screw driver (stubby) or 1/4" phillips bit with ratchet
- 10mm, 12mm & 14mm Sockets w/ extensions (14mm should be 6-point to prevent damage, some sockets may be to short and a long socket may work better)
- 14mm open-ended wrench
- Dremal with a small grinding bit (to prevent a lengthy fight with a bolt clearance)
Prep- Put the key in the ignition and turn to acc to unlock steering
- Turn the wheel to the left & right and remove the exposed phillips screws on the column (steering wheel doesn't need to be removed)
- Straighten the wheel
- Roll down driver window (or open the driver door so the window retracts before disconnecting battery)
- Turn the car off and remove the key
- Pop hood and disconnect the battery cable (since some cables will be disconnected and to prevent error codes)
- Optional - place pieces of tape on upper & lower seat tracks and mark with pen to easily put seat back to preferred location when done
- Slide the driver seat to the rear most position (taking the seat out makes working on it easier if you plan on crawling under dash, I just sat upside down in seat instead)
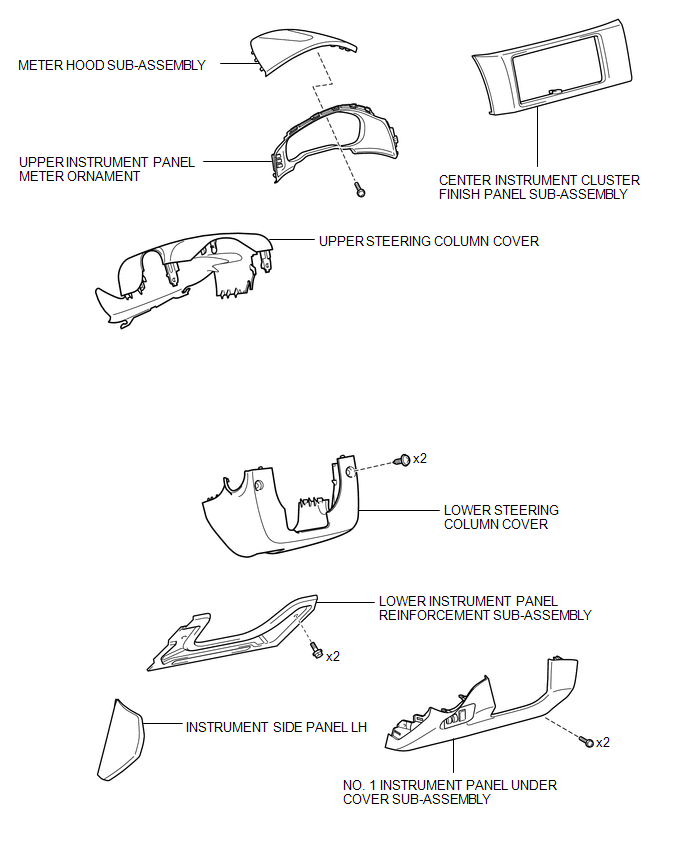
Remove trim pieces
 - Remove the instrument side panel (pry away from the dash starting from the bottom then moving up the rear-ward side, clips disengage leftwards)
- Remove the 2x phillips screws (one at the bottom behind the panel that was just removed, and the other under the dash to the left of the center console)
- Pull the instrument panel under cover rear-ward to disengage (it will still be connected with some wires)
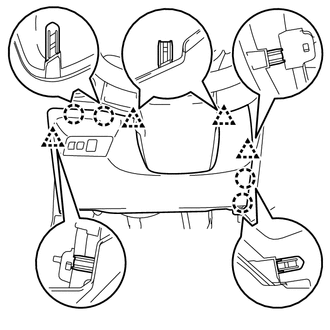
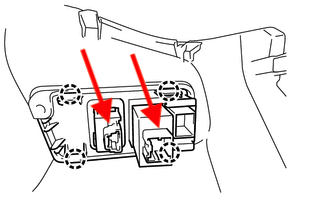
- Disconnect the wire connectors for the trunk button & instrument dimmer (push tab in, then pull plug out) (don't remove the button assembly from the trim panel)
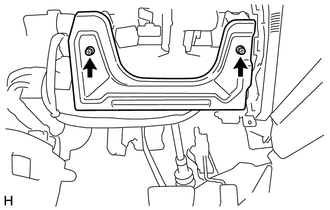
- Remove the 2x 10mm bolts holding the lower instrument panel reinforcement in place and remove reinforcement
- Unlock the steering wheel tilt adjustment so the steering column drops to it's lowest position, and leave it unlocked
- Remove the lower steering column cover (push lightly at seams to pop apart) (don't remove the top yet)

- Remove the center instrument cluster finish panel (radio/dash trim piece) by prying it rear-ward (it obscures part of a panel that will be removed)
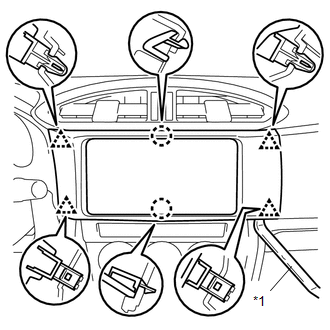
- Remove the 1x phillips screw holding the instrument cluster "meter hood" and remove hood by sliding it rear-ward (a stubby screwdriver or 1/4" phillips bit on a ratchet works best for the screw)
- Disengage the upper steering column cover by pulling up, maneuver it up and away from the key collar (it will still be attached to the car via a piece of material)
- Remove the upper instrument panel bezel by pulling sides rear-ward, then lifting up the center (it will be attached to the upper steering column cover, fold the steering column cover up into the bezel)
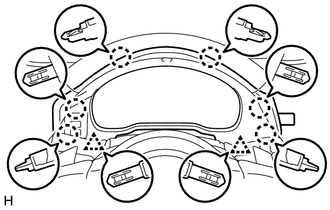

- Disconnect the wire connector for the instrument display buttons (push tab in, then pull plug out, plug disconnects upwards)
- Remove the now detached upper steering column cover / upper steering column cover
- Don't remove the instrument cluster
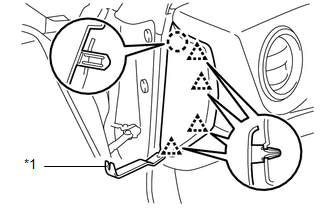
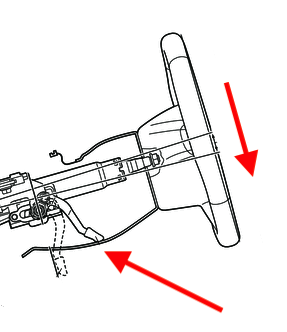
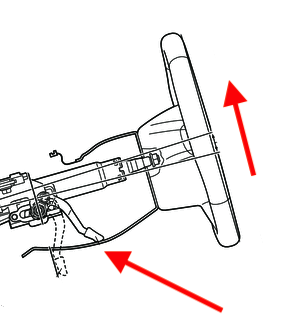
Remove steering column- Lift steering column tilt to highest position and re-engage tilt lock
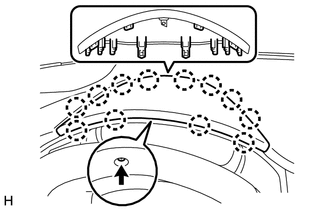
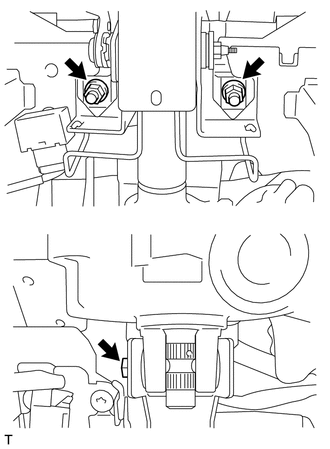
- Loosen the 14mm nuts (under instrument cluster) holding the steering column up (they are very tight, 30 ft-lb, use a 6-point socket and don't damage them), unscrew most of the way, but don't remove them yet (allows the column to rotate which makes the next part easier). Some people say taking them off makes it easier to remove the 14mm flange bolt, but I didn't want the column falling on me while I was under the dash struggling with the 14mm flange bolt. Nuts are at the top of the diagram below, flange bolt is at the bottom of the diagram
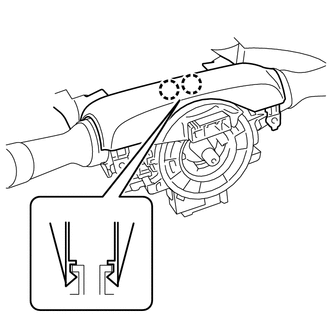
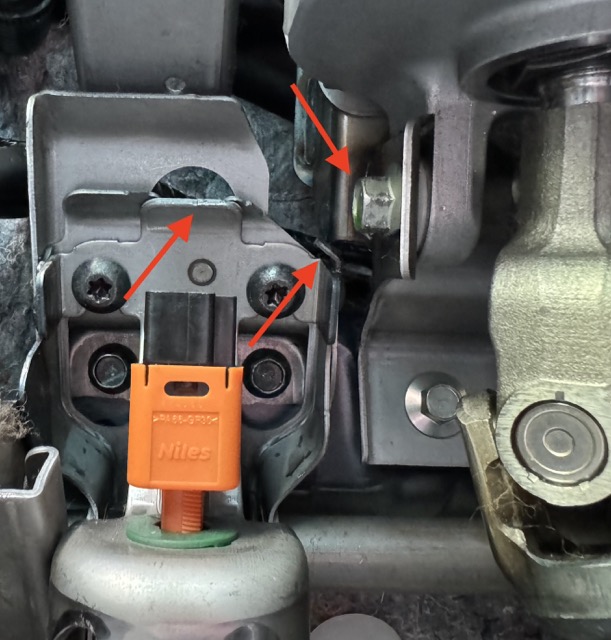
- The troublesome flange bolt, here's what we're dealing with... The bolt will get caught on the two metal tabs...
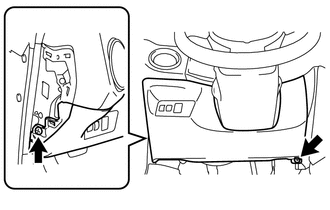
- Disconnect (carefully!) the brake pedal sensor wire connector (push tab in while holding body in place, then pull out)
- Use an open-ended wrench to unscrew the 14mm flange bolt on steering column under dash and pull it out till it becomes wedged on brake mounting bracket (grab and wiggle the EPS motor sticking up from the steering column to remove pressure from the bolt)
- Try fighting with 14mm flange bolt (lifting EPS motor helps), or use dremal in next step (what I ended up doing after a while)
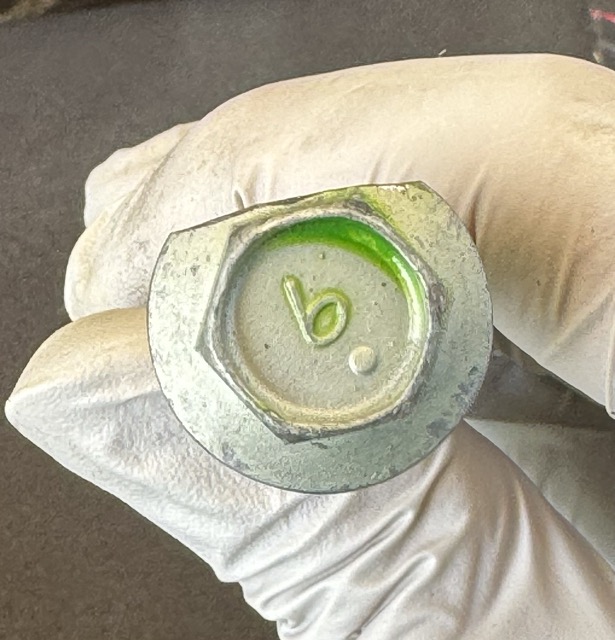
- Use a dremal with small grinding bit to grind off a side of the flange bolt (grind while it's still partially in place and wedged with the brake mount) (oddly Toyota considers the bolt disposable and it's meant to be replaced with a new one, I'll be re-using it...)
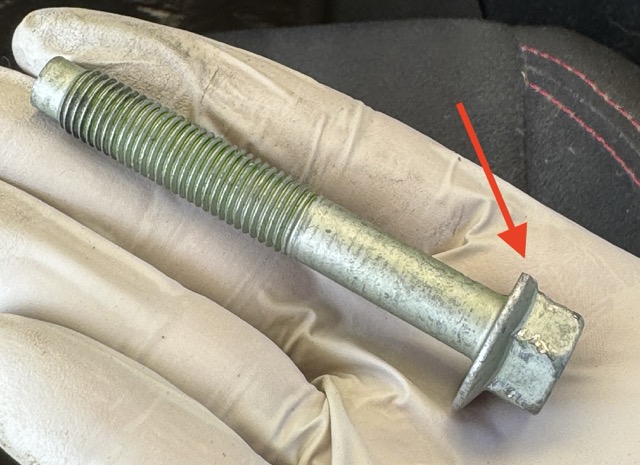
- Rotate the flange bolt to clear the brake mounting bracket and remove the bolt (lifting the EPS motor can help too)
- Get out from under dash...
- Lay something under the dash to catch the remains of the old damper that will fall out later
- Remove the two loose 14mm nuts from earlier and gently lower the steering column to rest on the floor (it will rotate, it's fine, watch the wires though)
Remove EPS motor and prepare for re-assembly- Observe the orientation of the EPS motor on the steering column and how the wires are routed to it
- Remove the two 12mm bolts holding the EPS motor to the steering column
- Lift the EPS motor off (steering column will rotate further, it's fine)
- Remove the plastic damper that was between them (Don't loose the little rubber star in the middle!!!)
- Clean out the chunks of rubber laying in both sides (column & motor) (check using mirror or phone to make sure you got it all)
Reassembly - steering column- Rotate and hold the steering column so it's facing the right way up (steering wheel will still be on floor supporting weight, just hold the column so it doesn't rotate back around)
- Put the new damper in the steering column side, make sure it slips down around the teeth
- Put the rubber star in the middle of the damper, it should be laying flat
- Bring the EPS motor in contact to the steering column and line up for assembly (make sure orientation and wires are correct). While applying light pressure to the motor, allow the column to rotate slightly so the teeth rotate and line up, this will allow it to mate fully back together.
- Install the 12mm bolts so they are still loose and make sure the motor is properly(evenly) seated
- Tighten the 12mm bolts (no torque specs found and I didn't measure either)
- Lift the steering column back up while holding the EPS motor up so it goes back in it's opening, then put the two nuts slightly on to hold it up
- Put the 14mm flange bolt back in place: lift the column to line up holes to get it started, push it in while wiggling the column/motor till the bolt reaches the threads on the other side, then grab the EPS motor and lift up while turning the bolt with your other hand to start threading it.
- Torque specs
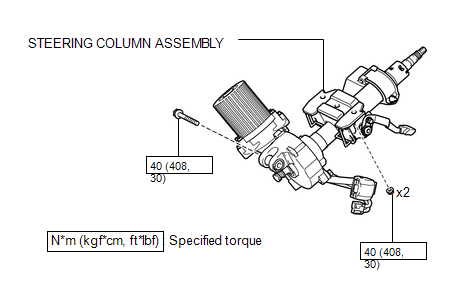
- Tighten the 14mm flange bolt - specs say 40 Nm (408 kg-cm, 30 ft-lb) but I didn't bother with a torque wrench due to space issues
- Re-attached brake sensor wire connector (make sure it is fully seated and locking tab engages)
- You're done under the dash now.
- Lift the steering column up and finger tighten the 14mm nuts
- Tighten the 14mm nuts to spec - 40 Nm (408 kg-cm, 30 ft-lb) (these I did to spec to prevent the column becoming loose in the future while driving)
Reassembly - trim pieces- Re-install in reverse order from above (snug screws so as to not strip plastic holes)
- Don't forget to plug wires back in (and make sure locking tabs engage)
Final checks- Re-connect battery
- Turn key to acc
- Turn steering wheel left/right and re-install screws
- Press trunk button and check dimmer wheel functionality (don't forget to close trunk)
- Press instrument display buttons to check functionality (don't forget to make sure display option for mph/kph is set correctly)
- Make sure brake lights turn on/off with pedal
- Make sure no check engine light is on (if so, did you re-connect all wires? you can also use a reader to see what it's complaining about and clear it to see if it comes back)
- Drive car slowly and turn wheel back/forth to make sure steering isn't heavy and there are no noises from power steering
Last edited by fireblaze; 05-03-2024 at 11:33 PM.
|


 05-03-2024, 10:50 PM


 Similar Threads


